Installation: Blue Iris versus ZoneMinder

Overview
Although this post is not intended to be an instruction manual for installing these two NVR software programs, I do step through the processes and link to step-by-step instructions. The true intention is to give you a window into my experience setting up both systems up to the point of streaming a camera.My skill level
Since I'm installing on operating systems where I have different skill levels, you should know where I stand on each. I want this evaluation to be as fair as possible, but I can't alter my knowledge of one system in such a short time-frame - so we just have to deal with and acknowledge the difference:
- Windows: Intermediate. At one time I knew much more than I do today, but hey, Windows is easy, and for the purposes of installing Blue Iris, I rarely, if ever, had to dig into my Intermediate skill bag.
- Linux: Rusty Novice. As with Windows, I used to know more than I do now. The difference is, for installing ZoneMinder I definitely had to Google (or ask my daughter) some of the basics for Linux such as vi commands. Worse were the errors encountered during installation that weren't entirely intuitive and prompted me to wipe and start over multiple times. Presumably, someone with more Linux experience would have been able to work through those issues.
Please refer to my NVR Testing Platform post for tips on installing an OS into ESXi. The remainder of this article will assume you are installing on bare metal.
So let's get to it ...
Dynamic DNS
Many of my recommendations in this and other articles assume that you have a static IP address or DNS name assigned to the outside interface of your network. If you haven't already done so, I would setup Dynamic DNS before going any further. DynDNS is one way to do this; it is a commercial product but it is inexpensive, includes great documentation, has lots of domains to choose from, and is extremely reliable.So let's get to it ...
Installing Windows and Blue Iris
Install Windows:
- Obtain a Windows 10 Pro serial number. I recommend Pro the Home version does not include the remote desktop component. Approximately $59 online.
- Download the installation media and put on a bootable device [link].
- Boot to the installation media and follow the on-screen prompts to install Windows 10. [link to basic instructions]
- I highly recommend setting a static IP address on the machine after installation. This computer, although running a desktop operating system will be functioning as a server and to save frustration down the road you should make sure its address won't change. [link to basic instructions]
- I recommend now turning on remote desktop access on this Windows 10 computer [link to basic instructions]
- Install a remote desktop client on your favorite computer, and you can login to this computer from wherever you are located.
- Optional: Forward port 3389 through your firewall so that you can remotely manage this machine away from your home network.
Install Blue Iris:
- Download the installation media from blueirissoftware.com.
- Install the software. This is a series of clicking NEXT, agreeing to a license agreement, choosing 32 or 64 bit, and then choosing the free 15-day evaluation period by clicking NEXT and then DEMO. Pretty simple.

Setting up your first camera on Blue Iris:
I'm adding screenshots just to show how very simple this really is because some are complaining about Blue Iris not having a user manual. In reality, it is very intuitive, at least at the basic level of adding cameras.
1. Click on the Camera icon in the top left corner.


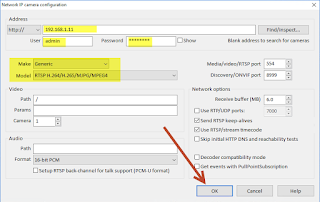


2. Name your camera and click Next.

3. Enter the IP address of your camera and any username/password combination you assigned when putting it on the network. Then choose your make/model of camera from the drop down. If in doubt, choose Make: Generic and Model: RTSP H.264/MJPG/MPEG4. You may need to refer to your camera documentation to complete this step.

And there you go - you now have a camera streaming to Blue Iris.

For my testing, I added 3 additional cameras.
Finally, you'll want to install the Blue Iris mobile app on your phone for $9.99.
- Time taken: ~2 hours from start to finish.
- Effort/knowledge level: 3/10
- Total cost: $60 (full version of Windows Pro), $60 (full version of Blue Iris), $10 mobile app = $130 + cost of hardware.
Installing Linux and ZoneMinder
If you're new to Linux, or a rusty novice as I, then this could prove to be a bit of a challenge. It may take some time (and even starting over multiple times as in my case), but stick with it and keep googling
If you want to virtualize Linux, it's a great idea - but I wouldn't recommend doing it on Windows; it would be much better to do so on VMWare ESXi [read about it here].
Where to install:
If you're thinking of installing ZoneMinder on Windows I would let that thought pass. Unless you're some serious propeller-head that wants to take the code for Linux and rebuild it for Windows it isn't going to work. The only real option would be to install Linux as a virtual machine on Windows (using VMWare or Parallels). But that really doesn't buy you much because every bit of the Linux complexity you're trying to avoid still applies - you now just have a Windows and virtual environment to tend to. If you're trying to use an existing piece of Windows hardware that's always on anyway, that's the only reason why I would see you wanting to do this - but keep in mind, video processing is intensive and sharing that with other processes is could impact both negatively.If you want to virtualize Linux, it's a great idea - but I wouldn't recommend doing it on Windows; it would be much better to do so on VMWare ESXi [read about it here].
So, being that you have to use Linux - what flavor should you choose? ZoneMinder isn't very prescriptive on this subject, and as most Linux gurus will tell you, there really isn't any reason you can't get ZoneMinder working on virtually any version of Linux. I landed on Ubuntu Server [download here]. Ubuntu Server has a process published by ZoneMinder for installing (big plus), and it's a distro I've used before. Technically you could use the Ubuntu Desktop version - but there is no reason to be running all that Desktop stuff on what amounts to a server in the long run. Ubuntu Server only provides a terminal interface.
If you are concerned about operating a computer by terminal interface alone, don't sweat it - once ZoneMinder is installed, you won't do much on the Operating System; ZoneMinder is managed via a web browser. However, you will need to brush up on vi or nano skills to edit config files such as /etc/network/interfaces to get it installed and stabilized. If it is too daunting and you feel like you need a GUI, you might want to seriously consider just using Blue Iris.
If you are concerned about operating a computer by terminal interface alone, don't sweat it - once ZoneMinder is installed, you won't do much on the Operating System; ZoneMinder is managed via a web browser. However, you will need to brush up on vi or nano skills to edit config files such as /etc/network/interfaces to get it installed and stabilized. If it is too daunting and you feel like you need a GUI, you might want to seriously consider just using Blue Iris.
Install Linux:
If you're still with me and ready to proceed with the terminal interface - let's get going. Stick with it and Google is going to be your friend here.- Install Ubuntu Server. Documentation can be found [here]. Be sure during the installation of Ubuntu Server that you install the LAMP server components. LAMP stands for Linux, Apache (web server), MySQL (database) & PHP (personal home page). All of these components will be required to make ZoneMinder work.
- As with Windows I highly recommend to assign a static IP address by editing the /etc/network/interfaces file.
- Install an SSH client on your favorite computer so you can access this machine's terminal remotely. PuTTY or Termius are great options.
- Optional: Forward port 22 through your firewall so that you can remotely manage this machine when off your home network.
 |
| Termius client for Windows |
Install ZoneMinder:
- Follow the ZoneMinder instructions for installing on Ubuntu 16.04 [here]. It looks pretty straightforward, but my first three attempts were anything but successful. I'll explain why:
- 1st attempt: I didn't wait 20 minutes for it to unpack MySQL. I thought it hung and restarted the machine. DON'T DO THIS, it just takes a long time unpack I guess.
- 2nd attempt: I couldn't get video to stream through the browser, but the mobile app worked. There is an appendix step later in the instructions that says:
From console go toOptions->Pathand make sure PATH_ZMS is set to /zm/cgi-bin/nph-zms. Sure enough, my path was missing /zm at the beginning of the path but of course I didn't find this out until the 4th attempt. - 3rd attempt: I didn't get the latest release "add-apt-repository ppa:iconnor/zoneminder". This step is critical. The older repo doesn't have the PATH_ZMS issue above, but it is definitely out of date and has other issues.
- 4th install - I was very meticulous about making sure I didn't miss any steps. It was then that I read all the way through the rest of the documentation and found/fixed the PATH_ZMS issue and it all started working.
- Open up a browser on your network and go to http://<ip address>/zm. If you get something that looks like this, you're in business.

If you don't see something like the above page in your browser, something didn't go right and you need to go back through the instructions or completely start over as I did. In my experience the ZoneMinder instructions need to be completed sequentially, so trying to go back and fix something didn't help me. Additionally, I'm not versed in SQL or PHP enough to trust that when I had a problem that I could fix it without completely bungling it forever. But don't worry, installing Ubuntu Server with LAMP takes less than 10 minutes, and installing ZoneMinder would only be about 15 minutes too if it weren't for waiting 20 minutes for MySQL to unpack after doing your apt-get upgrade. For this reason, if you're not a Linux guru and you have doubts, I highly recommend completely starting over with a fresh LAMP installation before trying to reinstall ZoneMinder.
Setting up the first camera in ZoneMinder:
- First, start with the ZoneMinder Wiki. But also try Googling your camera model and ZoneMinder (e.g. "setup amcrest camera zoneminder") and there is a chance you will see an exact article to help you set it up. I got lucky with my Amcrest PTZ cameras [here].
- Install zmNinja on your mobile device for (iOS is $5).
For all intents and purposes, we are now at the same place as with Blue Iris, albeit with a little more grey hair.
- Time taken: ~9 hours from start to finish. Starting over 3 times definitely contributed to this, so if you get it right the first time you can save a significant amount of time.
- Effort/knowledge level: 6/10
- Total cost: $5 for the mobile app = $5 + cost of hardware.
Conclusion:
Total cost of ownership
I spent approximately $1300 building a piece of hardware that seems reasonable to handle 8-16 cameras. Certainly, for <8 cameras or only doing remote viewing and very minimal motion detection and recording, you could save a few hundred dollars. My testing has shown the limiting factor in performance of your NVR is the CPU. Since I plan for 12 outdoor and 4 indoor cameras with a fair amount of motion detection and recording - this $1300 seems to be the minimum spec for doing this. Therefore, this is my investment including software licenses:- Total cost for Blue Iris: $1430.00
- Total cost for Zoneminder: $1305.00
Initial look and feel
The difference between the two systems on the computer web browser is day and night. Blue Iris is intuitive, crisp, clear and downright pretty. ZoneMinder is quite mundane, but it can be customized with skins. On ZoneMinder the streamed images have to be resized by a drop-down menu whereas Blue Iris scales to the screen/window size.When using only the very basic feature to stream video in the mobile app, zmNinja and the Blue Iris seem comparable. However, zmNinja needs two different login configurations; one for inside and one for outside my network. Whereas, Blue Iris has both options built into one configuration so no matter where I am, the app just works.
System Performance and resource utilization
This might surprise you, but in this apples-to-apples comparison, Windows is using less CPU; not a whole lot less --- but it is less. I let both systems sit stagnate for an hour with no remote apps running to get these readings. To me, the fact that Windows is consuming less CPU than Linux is just fascinating.Ubuntu Server CPU (avg 39.26%)

Ubuntu Server Memory (3.98GB)

Windows 10 Pro CPU (avg 36.48%)

Windows 10 Pro Memory (4.57GB)

So, the Linux-ZoneMinder combination is a little bit better at managing memory, and the Windows-Blue Iris combination is a little bit better at managing CPU. Since CPU is the limiting factor, I'd have to give a slight nod to Blue Iris mainly for proving that a Windows app can compete with Linux for resource management.
In summary
It's a toss-up at this point. It really comes down to what operating system you are more comfortable with. The fact is, installation is only one small facet of the NVR system, and you could easily argue that it only has to be done once, so what's the big deal about one OS being more difficult than the other to setup?Over the coming weeks I will be looking at other features and testing performance as they are implemented --- this could easy push me to recommend one over the other.
That all said, I've tried to be as fair as possible but ... if I'm completely honest, if I weren't already committed to blogging the differences and making sure I give ZoneMinder a fair shake, I probably wouldn't have made it through the multiple installations of ZoneMinder before I gave up on the idea altogether. 6 hours of my time as compared to the $125 cost uplift for software licenses is a no-brainer; and on the surface Blue Iris seems to be a little more refined.
... but I'm probably a little head of myself, so stay tuned for more testing.

Comments
Post a Comment